

© BOPP Patrick 2000 - 2025
The joy of playing with initially well running locomotives does not always remain undimmed. In some
locomotives in particular, damage to the gearbox occurs over the years, even though the hobbyist has handled
his vehicles with care and has even not used them for a long time.
Who hasn't experienced this?
At some point, you've bought a locomotive and, of course, let it run. Everything's fine, it runs perfectly and
beautifully, just as it's almost typical for American machines and as is generally the case for locomotives in this
category. In short, you are satisfied with the purchase. After a year or two, the moment comes when you want
to use it again. But now comes the scary moment: you put it on the tracks and are shocked by the terrible
driving behavior: the locomotive no longer runs as smoothly as it did at the beginning, but instead it hobbles,
makes a terrible noise and has almost no tractive power anymore. The hobbyist will initially suspect power
pickup problems, clean the locomotive and rail, but there is no success. Lack of lubrication? But after clipping
off the floor cover on the bogies, you notice that everything there is floating in grease, so everything is OK?
The layer of fat makes it almost impossible to identify the origin of the problem at first, because it's in the gears!
One or more of them have cracks that are the cause of the poor driving behavior. Tooth by tooth Once you have
found the basic fault, you can then easily start to fix it. But knowing the cause is also quite interesting. The
transmission pinions of the drive axles were made of plastic at one time and this has the property of becoming
brittle after a while if it is not used regularly. Partly this is due to the plasticizer and/or the material. If you want to
use the locomotive again after a long period, the plastic gear(s) tend to burst. This longitudinal crack affects the
distance between the teeth; if there is a gap, they can no longer mesh well or slip through .The defective spot
sometimes comes together tooth to tooth and the machine hops as a result. You can also recognize the fault by
a slight, dull impact. Today these pinions are made of softer Teflon and the problem of them becoming brittle
due to drying no longer exists. This short description is valid for both new and used material.
The solution to the problem is to replace these pinions. You can purchase it from a good American model
railway dealer. There are two variants, once the pinion alone and once the entire axle. If you place the
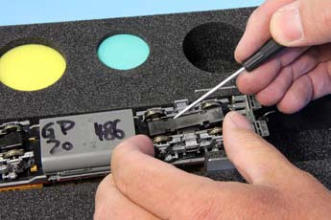
locomotive backwards in a locomotive bed, you can see a cover on the bogies (picture 1), which extends over
the entire length. This must be lifted and removed very carefully with a fine slotted screwdriver. Then the axles
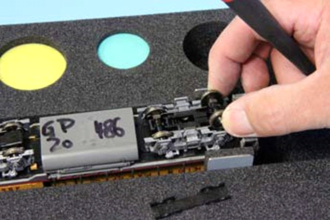
with the plastic pinions are presented to you. You lift them very carefully out of the holder and pull the two
halves of the axle apart, (picture 2), removing the gear from its counterpart. It is important to ensure that the two
brass squares on the outside of the pinion do not get lost. They have the function of passing on the current from
the wheels to the power strip on the side. Now that the various parts of the axle are on the table, you can
replace the defective gear with the new one. Then check the track width using a gauge or on a piece of track
and you can reinsert the whole thing. But be careful, inserting, it requires a bit of patience (picture 3), as the
brass blocks don't always want to slide into place right away. Then you have to help with tweezers. Once the
axles are back in their place, you should let a drop of oil or grease (really just a drop) run into the new pinion.
Then you clip the cover plate on again very carefully. Once, new parts have been brought together with old
parts, it is a good idea to let the locomotive run in both directions again for at least a quarter of an hour. Once
this has been done, you can have fun again, playing with the locomotive.
HOPPY LOCOMOTIVE


The replacement gears can be purchased as universal spare parts from model railway dealers (with an American range)
or from the respective locomotive manufacturer.
PICTURE-2
The stub axles with the brass blocks are pulled along
Remove the damaged gear using gentle force
PICTURE-1
Use a smaller slotted screwdriver to spread them apart
The locking lugs on the bogie move slightly outwards and lift
the cover up at the same time.
PICTURE-3
When you put the axle back in, the brass pieces tend to move a
little sideways. You have to correct something with tweezers or a
screwdriver.


© Irure ut pariatur ad ea in ut in et. In incididunt sed tempor
The joy of playing with initially well running
locomotives does not
always remain
undimmed. In some
locomotives in
particular, damage to
the gearbox occurs
over the years, even
though the hobbyist
has handled his
vehicles with care and
has even not used
them for a long time.
Who hasn't
experienced this?
At some point, you've bought a locomotive
and, of course, let it run. Everything's fine, it
runs perfectly and beautifully, just as it's
almost typical for American machines and as
is generally the case for locomotives in this
category. In short, you are satisfied with the
purchase. After a year or two, the moment
comes when you want to use it again. But now
comes the scary moment: you put it on the
tracks and are shocked by the terrible driving
behavior: the locomotive no longer runs as
smoothly as it did at the beginning, but instead
it hobbles, makes a terrible noise and has
almost no tractive power anymore. The
hobbyist will initially suspect power pickup
problems, clean the locomotive and rail, but
there is no success. Lack of lubrication? But
after clipping off the floor cover on the bogies,
you notice that everything there is floating in
grease, so everything is OK?
The layer of fat makes it almost impossible to
identify the origin of the problem at first,
because it's in the gears! One or more of them
have cracks that are the cause of the poor
driving behavior. Tooth by tooth Once you
have found the basic fault, you can then easily
start to fix it. But knowing the cause is also
quite interesting. The transmission pinions of
the drive axles were made of plastic at one
time and this has the property of becoming
brittle after a while if it is not used regularly.
Partly this is due to the plasticizer and/or the
material. If you want to use the locomotive
again after a long period, the plastic gear(s)
tend to burst. This longitudinal crack affects
the distance between the teeth; if there is a
gap, they can no longer mesh well or slip
through .The defective spot sometimes comes
together tooth to tooth and the machine hops
as a result. You can also recognize the fault by
a slight, dull impact. Today these pinions are
made of softer Teflon and the problem of them
becoming brittle due to drying no longer
exists. This short description is valid for both
new and used material.
The solution to the problem is to replace these
pinions. You can purchase it from a good
American model railway dealer. There are two
variants, once the pinion alone and once the
entire axle. If you place the locomotive
backwards in a locomotive bed, you can see a
cover on the bogies (picture 1), which extends
over the entire length. This must be lifted and
removed very carefully with a fine slotted
screwdriver. Then the axles with the plastic
pinions are presented to you. You lift them
very carefully out of the holder and pull the
two halves of the axle apart, (picture 2),
removing the gear from its counterpart. It is
important to ensure that the two brass squares
on the outside of the pinion do not get lost.
They have the function of passing on the
current from the wheels to the power strip on
the side. Now that the various parts of the axle
are on the table, you can replace the defective
gear with the new one. Then check the track
width using a gauge or on a piece of track and
you can reinsert the whole thing. But be
careful, inserting, it requires a bit of patience
(picture 3), as the brass blocks don't always
want to slide into place right away. Then you
have to help with tweezers. Once the axles
are back in their place, you should let a drop
of oil or grease (really just a drop) run into the
new pinion. Then you clip the cover plate on
again very carefully. Once, new parts have
been brought together with old parts, it is a
good idea to let the locomotive run in both
directions again for at least a quarter of an
hour. Once this has been done, you can have
fun again, playing with the locomotive.


- Pos 1
- Shop
- Shop-a
- Shop-a
- Shop-usa-billboards-horizontal-a
- Shop-billboards-b
- Shop-panneaux-publicitaire-a
- News
- Howto-a
- Tarpolin-a
- Tarpolin-b
- Tarpolin-fs
- Activ-a
- GALERIE
- Galery-a
- Self made-a
- Flatcars-a
- Boxcar-a
- Gondola-a
- Gondola-a
- Contact-a
- Rost-a
- Rust-a
- Hoppelloks-a
- Hoppelloks-a
- Hoppy locomotive-a
- Locomotive instable-a
- Ironscrap gondola-a
- Carweight-a
- Carweight-a
- Poids wagon-a
- Fototransfer-a
- Fototransferfr-a
- Fototransferen-a
- About
- Contact-a
- Contact-a
- Contact-a